Introduction to No-Bake Oreo Cheesecake Cups
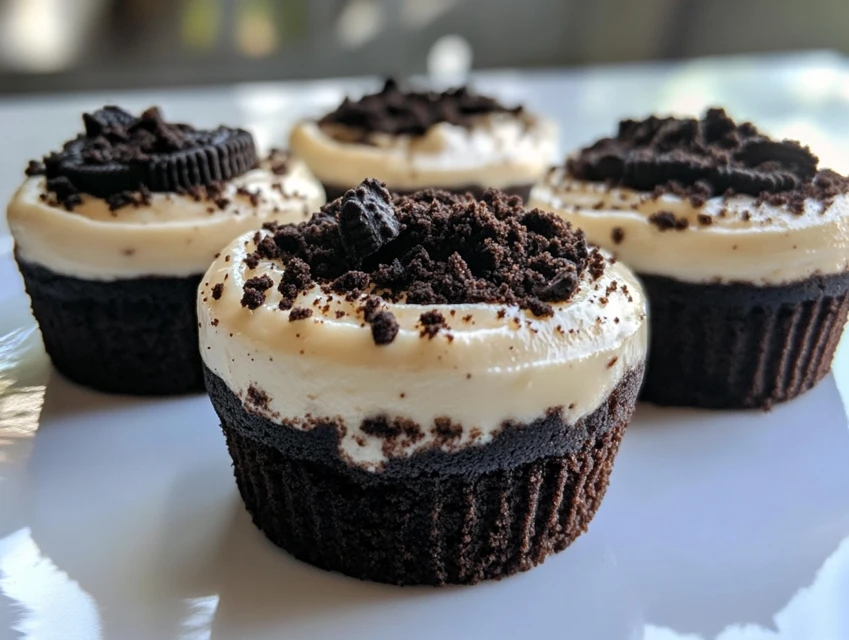
If you’re looking for a delightful dessert that’s easy to make and oh-so-tasty, then No-Bake Oreo Cheesecake Cups are just the treat for you! These little cups are a perfect blend of creamy cheesecake and crunchy Oreo goodness. They are not only simple to prepare but also a hit at any gathering. Whether it’s a birthday party, a family dinner, or just a cozy night in, these cups will surely impress your guests.
What Makes No-Bake Oreo Cheesecake Cups Special?
What sets No-Bake Oreo Cheesecake Cups apart from traditional cheesecakes? First, they don’t require any baking! This means you can whip them up quickly without worrying about oven temperatures or baking times. Plus, the individual cups make serving easy and fun. Each person gets their own little dessert, which adds a personal touch.
Another special aspect is the combination of flavors and textures. The creamy cheesecake filling pairs perfectly with the crunchy Oreo crust. This delightful contrast makes every bite a treat. You can also customize these cups with different toppings or flavors, making them versatile for any occasion.
In addition, these cups are a great way to introduce kids to cooking. They can help with crushing the Oreos or mixing the filling, making it a fun family activity. Overall, No-Bake Oreo Cheesecake Cups are not just a dessert; they are an experience that brings joy to both the maker and the eater!
Ingredients for No-Bake Oreo Cheesecake Cups
To create delicious No-Bake Oreo Cheesecake Cups, you’ll need a few simple ingredients. These items are easy to find and will help you whip up this delightful dessert in no time. Here’s what you’ll need:
- Oreo Cookies: 24 Oreo cookies for the crust and a few extra for garnish.
- Butter: 4 tablespoons of unsalted butter, melted. This helps bind the crust together.
- Cream Cheese: 8 ounces of softened cream cheese. It gives the cheesecake its rich and creamy texture.
- Powdered Sugar: 1/2 cup of powdered sugar. This adds sweetness to the filling.
- Vanilla Extract: 1 teaspoon of pure vanilla extract. It enhances the flavor of the cheesecake.
- Whipped Topping: 1 cup of whipped topping or whipped cream. This lightens the filling and adds fluffiness.
These ingredients come together to create a luscious filling and a crunchy crust that everyone will love. Feel free to adjust the quantities based on your preferences or the number of servings you need. Now that you have your ingredients ready, let’s move on to the next step: preparing your No-Bake Oreo Cheesecake Cups!
Step-by-Step Preparation of No-Bake Oreo Cheesecake Cups
Now that you have all your ingredients ready, it’s time to dive into the fun part: preparing your No-Bake Oreo Cheesecake Cups! Follow these simple steps to create a delicious dessert that everyone will love.
Step 1: Prepare the Oreo Crust
First, let’s make the crust. Start by taking your 24 Oreo cookies and placing them in a food processor. If you don’t have one, you can put the cookies in a zip-top bag and crush them with a rolling pin. Either way works great!
Once the cookies are finely crushed, add the 4 tablespoons of melted butter to the crumbs. Mix them together until the mixture resembles wet sand. This will help the crust hold its shape. Now, take your mixture and evenly distribute it into the bottom of your serving cups. Press it down firmly with the back of a spoon to create a solid base.
Step 2: Make the Cheesecake Filling
Next, it’s time to whip up the cheesecake filling! In a large mixing bowl, combine the 8 ounces of softened cream cheese and 1/2 cup of powdered sugar. Use an electric mixer to beat them together until the mixture is smooth and creamy. This should take about 2-3 minutes.
After that, add in 1 teaspoon of vanilla extract and 1 cup of whipped topping. Gently fold these ingredients together using a spatula. Be careful not to deflate the whipped topping too much. You want your filling to be light and fluffy!
Step 3: Assemble the No-Bake Oreo Cheesecake Cups
Now comes the fun part—assembling your cups! Spoon the cheesecake filling over the prepared Oreo crust in each cup. Fill them generously, leaving a little space at the top for toppings later. You can use a piping bag for a fancy look, or just a spoon works perfectly fine!
For an extra touch, you can crumble a few more Oreo cookies on top of the filling. This adds a nice crunch and makes your dessert look even more appealing.
Step 4: Chill the Cups
Finally, it’s time to chill your No-Bake Oreo Cheesecake Cups. Place them in the refrigerator for at least 2 hours. This allows the filling to set properly and makes the flavors meld together beautifully. If you can wait longer, chilling them overnight will make them even better!
Once they are chilled and ready to serve, you can enjoy your delicious creation. These cups are perfect for any occasion, and they are sure to impress your friends and family!
Variations of No-Bake Oreo Cheesecake Cups
While the classic No-Bake Oreo Cheesecake Cups are delicious on their own, there are many fun variations you can try! By changing a few ingredients or adding different toppings, you can create a whole new dessert experience. Let’s explore some exciting flavors and toppings that will take your cheesecake cups to the next level.
Different Flavors to Try
Why stick to just one flavor when you can have many? Here are some delightful variations to consider:
- Peanut Butter Oreo Cheesecake Cups: Add 1/2 cup of creamy peanut butter to the cheesecake filling. This will give your cups a rich, nutty flavor that pairs perfectly with Oreos.
- Mint Chocolate Oreo Cheesecake Cups: Mix in 1/2 teaspoon of peppermint extract into the filling. Top with crushed mint Oreos for a refreshing twist!
- Chocolate Oreo Cheesecake Cups: Use chocolate cream cheese instead of regular cream cheese. This adds an extra layer of chocolatey goodness.
- Strawberry Oreo Cheesecake Cups: Fold in 1/2 cup of pureed strawberries into the filling. This fruity addition will brighten up your dessert.
Feel free to experiment with other flavors too! The possibilities are endless, and you can create a unique dessert that suits your taste.
Alternative Toppings for No-Bake Oreo Cheesecake Cups
Toppings can make a big difference in the presentation and taste of your No-Bake Oreo Cheesecake Cups. Here are some fun ideas:
- Fresh Fruits: Add sliced strawberries, blueberries, or raspberries on top for a burst of color and freshness.
- Chocolate Drizzle: Drizzle melted chocolate over the cups for a decadent touch. You can use dark, milk, or white chocolate.
- Caramel Sauce: A drizzle of caramel sauce adds a sweet and gooey element that complements the cheesecake.
- Chopped Nuts: Sprinkle chopped nuts like walnuts or pecans for a crunchy texture.
Mix and match these toppings to create your perfect No-Bake Oreo Cheesecake Cups. With these variations, you can impress your guests with a dessert that’s not only delicious but also visually stunning!
Cooking Note for No-Bake Oreo Cheesecake Cups
When making No-Bake Oreo Cheesecake Cups, there are a few important cooking notes to keep in mind. These tips will help ensure your dessert turns out perfectly every time. Let’s dive into some key points to consider during the preparation process.
First, always use softened cream cheese. This is crucial for achieving a smooth and creamy filling. If your cream cheese is too cold, it can create lumps in your mixture. To soften it quickly, you can cut it into small cubes and let it sit at room temperature for about 30 minutes. Alternatively, you can microwave it for about 10-15 seconds, but be careful not to melt it!
Next, when crushing the Oreo cookies, aim for a fine crumb. This helps create a sturdy crust that holds together well. If you prefer a chunkier texture, you can leave some larger pieces, but be mindful that it may not hold as well when you serve the cups.
Additionally, chilling the cups is essential. The longer you chill them, the better the flavors meld together. If you can, let them sit in the fridge overnight. This will enhance the taste and texture, making them even more enjoyable.
Lastly, feel free to get creative! While the classic recipe is delicious, don’t hesitate to experiment with different flavors and toppings. This is your chance to make the dessert uniquely yours. Whether you add a twist of fruit or a drizzle of chocolate, your No-Bake Oreo Cheesecake Cups will surely be a hit!
By keeping these cooking notes in mind, you’ll be well on your way to creating a delightful dessert that everyone will love. Happy baking—or should we say, happy no-baking!
Serving Suggestions for No-Bake Oreo Cheesecake Cups
Once your No-Bake Oreo Cheesecake Cups are chilled and ready to go, it’s time to think about how to serve them! Presentation can elevate your dessert from simple to spectacular. Here are some delightful serving suggestions that will impress your guests and make your dessert even more enjoyable.
First, consider using clear cups or jars. This allows everyone to see the beautiful layers of the Oreo crust and creamy cheesecake filling. The visual appeal adds to the excitement of eating them. You can find small mason jars or elegant dessert cups that work perfectly for this purpose.
Next, think about garnishing your cups. A dollop of whipped cream on top adds a light and fluffy touch. You can also sprinkle crushed Oreos or chocolate shavings for an extra crunch. Fresh mint leaves can add a pop of color and a refreshing flavor. These small details make a big difference in presentation.
For a fun twist, serve your No-Bake Oreo Cheesecake Cups on a dessert platter. Arrange them in a circle or a creative pattern. This not only looks beautiful but also makes it easy for guests to grab their own cup. You can even label each flavor variation if you’ve made different kinds!
If you’re hosting a party, consider pairing these cups with coffee or tea. The rich flavors of the cheesecake complement the warmth of a hot beverage beautifully. You can also serve them alongside fresh fruit or a light salad to balance the sweetness.
Lastly, don’t forget about the occasion! For birthdays, you can add a candle on top of each cup. For holidays, consider themed decorations or colors. Personalizing your dessert for the event adds a special touch that everyone will appreciate.
With these serving suggestions, your No-Bake Oreo Cheesecake Cups will not only taste amazing but also look stunning on the table. Enjoy sharing this delightful dessert with family and friends!
Tips for Perfect No-Bake Oreo Cheesecake Cups
Creating the perfect No-Bake Oreo Cheesecake Cups is all about attention to detail. With a few helpful tips, you can ensure that your dessert turns out delicious and visually appealing every time. Here are some essential tips to keep in mind as you prepare your delightful treat.
First, always measure your ingredients accurately. This is crucial for achieving the right texture and flavor. Use measuring cups and spoons for precision. For example, when measuring powdered sugar, make sure to spoon it into the cup and level it off with a knife. This prevents your filling from becoming too sweet or too thick.
Next, don’t skip the chilling step! Chilling your No-Bake Oreo Cheesecake Cups for at least two hours is essential. This allows the filling to set properly and enhances the flavors. If you can, let them chill overnight. The longer they sit, the better they taste!
Another tip is to use high-quality ingredients. Opt for real vanilla extract instead of imitation. This small change can make a big difference in flavor. Additionally, choose fresh whipped cream or topping for a light and airy texture. Quality ingredients lead to a more delicious dessert.
When it comes to presentation, consider using a piping bag to fill your cups. This gives a professional look and makes it easier to control the amount of filling. If you don’t have a piping bag, a zip-top bag with a corner snipped off works just as well!
Lastly, don’t be afraid to get creative! Experiment with different flavors and toppings. You can add a swirl of fruit puree to the filling or mix in crushed candies for a fun twist. The more you play around with the recipe, the more unique your No-Bake Oreo Cheesecake Cups will become.
By following these tips, you’ll be well on your way to creating perfect No-Bake Oreo Cheesecake Cups that will impress everyone. Enjoy the process and have fun making this delightful dessert!
Breakdown of Time for No-Bake Oreo Cheesecake Cups
When making No-Bake Oreo Cheesecake Cups, it’s helpful to know how much time you’ll need for each step. This way, you can plan your day and ensure everything runs smoothly. Here’s a simple breakdown of the time involved in preparing this delicious dessert.
Prep Time
The prep time for No-Bake Oreo Cheesecake Cups is quite short. You’ll need about 20-30 minutes to gather your ingredients, crush the Oreos, and mix the cheesecake filling. This includes:
- Gathering all ingredients and tools.
- Crushing the Oreo cookies for the crust.
- Mixing the cheesecake filling until smooth.
- Assembling the cups with the crust and filling.
With a little organization, you can have everything ready in no time!
Cooking Time
Since this is a no-bake recipe, there’s no actual cooking time involved. However, you will need to chill the cups to let the filling set. This chilling time is crucial for the best texture and flavor. You should plan for at least 2 hours of chilling time in the refrigerator. If you can wait longer, letting them chill overnight is even better!
Total Time
In total, you can expect to spend about 20-30 minutes on preparation and at least 2 hours for chilling. This brings the total time to around 2 hours and 20-30 minutes. If you choose to chill them overnight, you can prepare them in the evening and enjoy them the next day!
With this time breakdown, you can easily fit making No-Bake Oreo Cheesecake Cups into your schedule. They are a quick and delightful dessert that will surely impress your guests!
Nutritional Information for No-Bake Oreo Cheesecake Cups
Understanding the nutritional information of your No-Bake Oreo Cheesecake Cups can help you enjoy them while keeping track of your dietary needs. Here’s a breakdown of the key nutritional components you can expect in each serving of these delightful treats. Keep in mind that the values may vary based on the specific ingredients you use and the portion sizes.
Calories
Each No-Bake Oreo Cheesecake Cup contains approximately 250-300 calories. This calorie count comes from the combination of the Oreo crust, cream cheese filling, and whipped topping. While they are a delicious indulgence, it’s good to enjoy them in moderation, especially if you’re watching your calorie intake.
Protein
In terms of protein, each cup provides about 4-5 grams. The cream cheese and whipped topping contribute to this protein content. While it’s not a high-protein dessert, it does offer a little boost, making it a satisfying treat after a meal or as a snack.
Sodium
When it comes to sodium, you can expect around 200-250 milligrams per serving. This sodium level mainly comes from the cream cheese and the Oreo cookies. If you’re watching your sodium intake, consider using low-sodium cream cheese or reducing the number of Oreos in the crust.
Overall, No-Bake Oreo Cheesecake Cups can be a delightful addition to your dessert options. By being mindful of the nutritional information, you can enjoy these tasty treats while maintaining a balanced diet. Remember, it’s all about moderation and enjoying the sweet moments in life!
FAQs about No-Bake Oreo Cheesecake Cups
Can I use different cookies for the crust?
Absolutely! While Oreo cookies are the classic choice, you can get creative with your crust. Try using other sandwich cookies like chocolate wafers or even graham crackers for a different flavor. If you prefer a gluten-free option, look for gluten-free cookies that can be crushed into crumbs. The key is to choose a cookie that complements the creamy cheesecake filling. So, feel free to experiment and find your favorite combination!
How long do No-Bake Oreo Cheesecake Cups last in the fridge?
No-Bake Oreo Cheesecake Cups can last in the fridge for about 3 to 5 days. Make sure to cover them tightly with plastic wrap or store them in an airtight container. This helps keep them fresh and prevents them from absorbing any odors from the fridge. If you notice any changes in texture or smell, it’s best to discard them. Enjoy them while they’re fresh for the best taste!
Can I freeze No-Bake Oreo Cheesecake Cups?
Yes, you can freeze No-Bake Oreo Cheesecake Cups! They freeze well and can be stored for up to 2 months. To freeze, place the cups in a single layer in a freezer-safe container. Make sure to cover them tightly to prevent freezer burn. When you’re ready to enjoy them, simply transfer them to the fridge to thaw overnight. This way, you’ll have a delicious dessert ready whenever you crave something sweet!
What can I substitute for cream cheese in No-Bake Oreo Cheesecake Cups?
If you’re looking for a substitute for cream cheese, there are a few options you can try. One popular alternative is mascarpone cheese, which has a similar creamy texture and rich flavor. You can also use Greek yogurt for a lighter option, but keep in mind that it may change the flavor slightly. Another option is to use a dairy-free cream cheese if you’re following a vegan or lactose-free diet. Just make sure to choose a brand that you enjoy, as it will affect the overall taste of your cheesecake cups!
Conclusion on No-Bake Oreo Cheesecake Cups
No-Bake Oreo Cheesecake Cups are a delightful dessert that combines simplicity with deliciousness. They are perfect for any occasion, whether it’s a family gathering, a birthday party, or just a sweet treat for yourself. The best part is that you don’t need to turn on the oven, making them a hassle-free option for busy days.
With their creamy filling and crunchy Oreo crust, these cups offer a wonderful balance of flavors and textures. Plus, the ability to customize them with different flavors and toppings means you can create a unique dessert every time. From peanut butter to mint chocolate, the variations are endless!
As you prepare your No-Bake Oreo Cheesecake Cups, remember the tips and tricks shared throughout this article. They will help you achieve the perfect texture and flavor. Don’t hesitate to get creative and make this recipe your own. After all, cooking is all about enjoying the process and sharing delicious moments with loved ones.
So, gather your ingredients, follow the steps, and get ready to impress your friends and family with these delightful treats. No-Bake Oreo Cheesecake Cups are sure to become a favorite in your dessert repertoire. Enjoy every bite!
No-Bake Oreo Cheesecake Cups
Equipment
- Food processor
- Mixing bowl
- Electric mixer
- Serving cups
- Spatula
Ingredients
Oreo Crust
- 24 cookies Oreo cookies Crushed for the crust.
- 4 tablespoons Unsalted butter Melted, to bind the crust.
Cheesecake Filling
- 8 ounces Cream cheese Softened for a creamy texture.
- 1/2 cup Powdered sugar Adds sweetness to the filling.
- 1 teaspoon Vanilla extract Enhances flavor.
- 1 cup Whipped topping Lightens the filling.
Instructions
- Crush 24 Oreo cookies in a food processor or zip-top bag until finely crushed.
- Mix the crushed Oreos with 4 tablespoons of melted butter until the mixture resembles wet sand.
- Evenly distribute the Oreo mixture into the bottom of serving cups and press down firmly to create a solid base.
- In a mixing bowl, beat 8 ounces of softened cream cheese and 1/2 cup of powdered sugar with an electric mixer until smooth and creamy.
- Add 1 teaspoon of vanilla extract and 1 cup of whipped topping, gently folding until combined.
- Spoon the cheesecake filling over the prepared Oreo crust in each cup, leaving a little space at the top for toppings.
- Chill the cups in the refrigerator for at least 2 hours to allow the filling to set.
- Serve chilled, optionally garnished with additional crushed Oreos or your choice of toppings.